MYOG (DIY) Child size ultralight pack step by step instructions with pictures!
When you plan for long distance backpacking, one of the biggest things you must consider is weight. You don't want to be hauling around 60 pounds worth of gear!
When it comes to kids and backpacking, you really need to be aware of how much weight they can carry comfortably. For the AT, we are pretty sure we want the kids to be able to carry at least a little bit of their own gear.
For that reason they need a pack. We got them each a tarn 18 from REI. While the pack is a great pack and the fit is pretty perfect on them, it weigh in at just over a pound. Now that may not sound like much, but when you are only carrying 5 pounds, a pack that weighs a pound is a lot!
So I came up with an idea to make the kids a pack! I know I could make it lighter, and then I could customize the fit too.
Now I should start this by saying I am a self taught beginner when it comes to a sewing machine. I know some very basics. So if I can do this, someone with more experience could really make this awesome!
Materials
Rip stop nylon (I bought it at Joann's fabric store)
1/2 inch webbing
Some 550 cord
Buckles
Elastic
Drawstring
Thread
First, I measured my child. From the top of the shoulder to the middle of the hip bone. And then about how wide they are from side to side.
For Boo, that is about 15 inches for torso height and 10 inches width.
I drew out a plan then cut out my fabric.
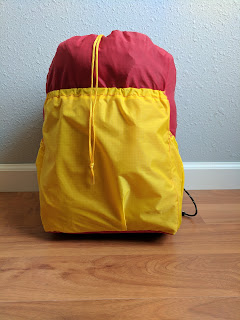
For this pack the main body is red while the pockets are yellow.

I made some little triangles to sew in to connect the shoulder straps to. I'm sure there is a better way to do the triangles, but this worked for me. I started with a rectangle about 4x8 inches, folded in half and sewed along all sides. Then sewed down catty-cornered most of the way, leaving a small part so that I could turn it right side out. I moved the needle over and sewed back up. Making 2 parallel lines going up the middle of the square. Then I cut between the lines and turned right side out. Ta-da! Triangles!


Then I sewed the pockets onto the side and back panels. I made the pockets bigger than the panels on purpose and pleated the bottom as I sewed it on, trying to make the pockets big enough to accommodate some stuff. I sewed my little triangles into the short side of the pocket, so that it faced the child once the pack is being worn.


Make sure that you put the elastic pieces into the casing before sewing the sides of the casing shut! I tacked it down later.

Once all the pockets were sewn on, I added the bottom piece and sewed the sides together. All right sides face each other, so once you have the bottom sewed completely on, you'll have the basic pack inside out. Make sure to keep those little triangles inside by the pockets. You want them on the outside of the pack once you turn it right side out!

I then folded the unfinished top of the bag down twice and sewed it all the way around the top. You can leave a small hole in the center top in the back to insert a drawstring later, or you can do like me and treat that as an after thought, rip a little bit of stitching and reinforce it again. Which ever floats your boat.

I then sewed a small strip of scrap fabric inside the pack on the back. This is so when I add the shoulder straps on, I'm sewing them to double the fabric since this will be the biggest stress place on the whole pack. I sewed the strip about 15 inches up since that is the top of my child's shoulders.


Now for the shoulder straps. I just traced the strap of the REI tarn to get the basic shape, add a 1/2 inch seam allowance all around and cut out 4 pieces. Then sew 2 pieces together, leaving it open at the top. Then Turn the tube of fabric right side out and then I rolled it down like you would roll up a pants leg. I cut out 1/2 inch foam I got from Joann's into the right shape and just slightly smaller than my traced image of the strap and slowly stuffed it into my fabric tube, unrolling as I went. I read somewhere that baby powder sprinkled on the foam would help it slide in better but I didn't have any. It worked fine without it.


Now I cut the foam down about 1.5 inches inside the tube so I could use the top of the tube to attach the shoulder straps to my reinforced strip on the back. I found the center of the panel and marked it, Then measured an inch in either direction to leave space for the neck. The tarn is exactly 2 inches about and that works good for my kids so I did the same. I sewed them on with a x box style stitch...a box with an x sewed in the middle of it.


to connect the bottom of the straps to the bottom of the pack, I used 550 cord and line locks to adjust them. I sewed the line locks to the bottom of the strap and then folded the 550 cord at the end and sewed it down to the triangle like so. Here are the line locks we used.


Remember that after thought drawstring? Yeah, now I did that. And then I tacked down the elastic by very patiently worked the elastic to the edge of the casing and tacking and repeating. Not hard, just tedious.
I added a chest strap and a little buckle designed for para-cord bracelets found at walmart.

And that's it! A complete ultralight child sized pack! Now to test it out! This is the pack filled with the things Boo wants to carry. Her sleeping pad, quilt, base layer, extra socks, headlamp, hand sanitizer, and water. It all fits nicely and this load weighs in at about 3.5 pounds!


When it comes to kids and backpacking, you really need to be aware of how much weight they can carry comfortably. For the AT, we are pretty sure we want the kids to be able to carry at least a little bit of their own gear.
For that reason they need a pack. We got them each a tarn 18 from REI. While the pack is a great pack and the fit is pretty perfect on them, it weigh in at just over a pound. Now that may not sound like much, but when you are only carrying 5 pounds, a pack that weighs a pound is a lot!
So I came up with an idea to make the kids a pack! I know I could make it lighter, and then I could customize the fit too.
Now I should start this by saying I am a self taught beginner when it comes to a sewing machine. I know some very basics. So if I can do this, someone with more experience could really make this awesome!
Materials
Rip stop nylon (I bought it at Joann's fabric store)
1/2 inch webbing
Some 550 cord
Buckles
Elastic
Drawstring
Thread
First, I measured my child. From the top of the shoulder to the middle of the hip bone. And then about how wide they are from side to side.
For Boo, that is about 15 inches for torso height and 10 inches width.
I drew out a plan then cut out my fabric.
For this pack the main body is red while the pockets are yellow.

First, I sewed the casing for the elastic on the pocket pieces.

I made some little triangles to sew in to connect the shoulder straps to. I'm sure there is a better way to do the triangles, but this worked for me. I started with a rectangle about 4x8 inches, folded in half and sewed along all sides. Then sewed down catty-cornered most of the way, leaving a small part so that I could turn it right side out. I moved the needle over and sewed back up. Making 2 parallel lines going up the middle of the square. Then I cut between the lines and turned right side out. Ta-da! Triangles!


Then I sewed the pockets onto the side and back panels. I made the pockets bigger than the panels on purpose and pleated the bottom as I sewed it on, trying to make the pockets big enough to accommodate some stuff. I sewed my little triangles into the short side of the pocket, so that it faced the child once the pack is being worn.


Make sure that you put the elastic pieces into the casing before sewing the sides of the casing shut! I tacked it down later.

Once all the pockets were sewn on, I added the bottom piece and sewed the sides together. All right sides face each other, so once you have the bottom sewed completely on, you'll have the basic pack inside out. Make sure to keep those little triangles inside by the pockets. You want them on the outside of the pack once you turn it right side out!

I then folded the unfinished top of the bag down twice and sewed it all the way around the top. You can leave a small hole in the center top in the back to insert a drawstring later, or you can do like me and treat that as an after thought, rip a little bit of stitching and reinforce it again. Which ever floats your boat.

I then sewed a small strip of scrap fabric inside the pack on the back. This is so when I add the shoulder straps on, I'm sewing them to double the fabric since this will be the biggest stress place on the whole pack. I sewed the strip about 15 inches up since that is the top of my child's shoulders.


Now for the shoulder straps. I just traced the strap of the REI tarn to get the basic shape, add a 1/2 inch seam allowance all around and cut out 4 pieces. Then sew 2 pieces together, leaving it open at the top. Then Turn the tube of fabric right side out and then I rolled it down like you would roll up a pants leg. I cut out 1/2 inch foam I got from Joann's into the right shape and just slightly smaller than my traced image of the strap and slowly stuffed it into my fabric tube, unrolling as I went. I read somewhere that baby powder sprinkled on the foam would help it slide in better but I didn't have any. It worked fine without it.


Then I sewed some 1/2 inch webbing (Joann's again) in a daisy chain going up the strap. I left a big gap in part of it intended for a chest strap, but that ended up being too high up for the chest strap. Oh well. I sewed it on by doing a simple bar stitch every few inches. I melted the ends of all the webbing with a lighter to keep it from fraying.


Now I cut the foam down about 1.5 inches inside the tube so I could use the top of the tube to attach the shoulder straps to my reinforced strip on the back. I found the center of the panel and marked it, Then measured an inch in either direction to leave space for the neck. The tarn is exactly 2 inches about and that works good for my kids so I did the same. I sewed them on with a x box style stitch...a box with an x sewed in the middle of it.

Then I added a hanging handle on the top out of 1 inch webbing.

to connect the bottom of the straps to the bottom of the pack, I used 550 cord and line locks to adjust them. I sewed the line locks to the bottom of the strap and then folded the 550 cord at the end and sewed it down to the triangle like so. Here are the line locks we used.


Remember that after thought drawstring? Yeah, now I did that. And then I tacked down the elastic by very patiently worked the elastic to the edge of the casing and tacking and repeating. Not hard, just tedious.
I added a chest strap and a little buckle designed for para-cord bracelets found at walmart.

And that's it! A complete ultralight child sized pack! Now to test it out! This is the pack filled with the things Boo wants to carry. Her sleeping pad, quilt, base layer, extra socks, headlamp, hand sanitizer, and water. It all fits nicely and this load weighs in at about 3.5 pounds!


The REI Tarn 18 weighs 17 ounces. I do love the tarn though! My pack weighs in at a whopping 3 ounces! That cut down on weight! The materials to make one pack was under $20, while the Tarn 18 runs about $40.


Here is the completed pack. The fit is decent. Both kids wanted to know where the hip belt was, so I may add that on. But I think if mom and dad keep carrying the quilts they probably won't need the hip belt. What do you think? For a load under 4 pounds do you think they need a hip belt?


Comments
Post a Comment